You have probably come here by searching how to crop a picture into a circle or something like that. Well, you have got your answer. Turning the photos into a circle image instead of rectangular or squares is much easy than you think. Also, the circle crop photo looks unique and modern on the web or any design.
Today, we will learn how to crop a picture into a circle in Adobe Photoshop? This process takes a few minutes to finish. To crop an image in a circle, you can use any version of Photoshop. But, here we are using the latest and most popular photo editing software of Adobe. So, we start the process with the Adobe Photoshop CC 2021 version.

This is the photo that we want to crop into a circle.

And this is the final photo that we will get after cropping it into a circle.
Table of Contents
Step 1: Open the image Photoshop
First, you need to open the image in Photoshop. You need to click on Open > Select Image and open like the below picture.

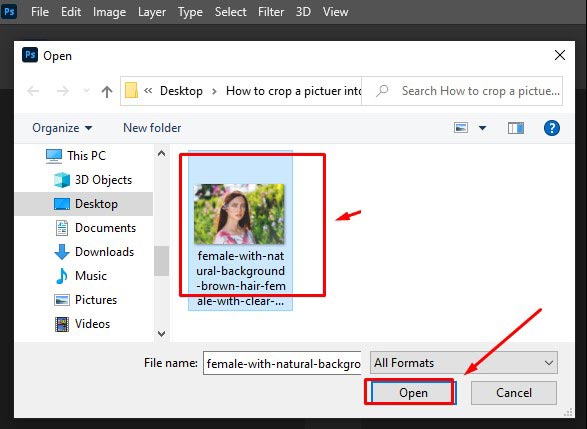
Step 2: Unlock the Background Layer
In this step, you need to convert the background into a usual layer, because we need to crop circle images with transparency. In this case, Photoshop does not allow transparency in the background layer, so you need to unlock the background layer. To unlock the background layer, click on the lock icon with your mouse. It will unlock
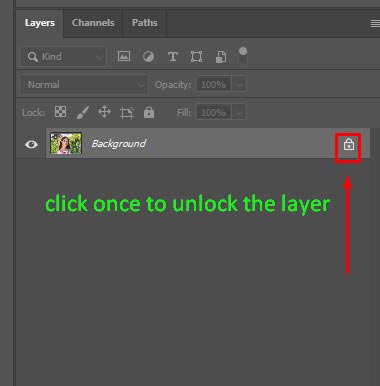
After clicking on the unlock Icon the layer will convert to a normal layer like this
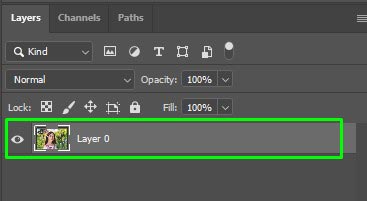
If you are using old versions of Photoshop then you need to press and hold the Alt or (win) key on your keyboard and double click on the background layer.
Step 3: Select the Elliptical Marquee Tool
Now you have to select the Elliptical Marquee Tool from the toolbar. The Elliptical Marquee tool hides behind the Rectangular Marquee Tool. So, you have to click the right button on your mouse and select the Elliptical Marquee Tool. That is right under the Rectangular Marquee Tool.
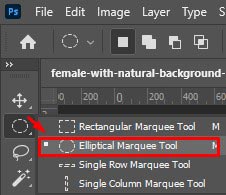
Step 4: Draw a Circular Selection Outline
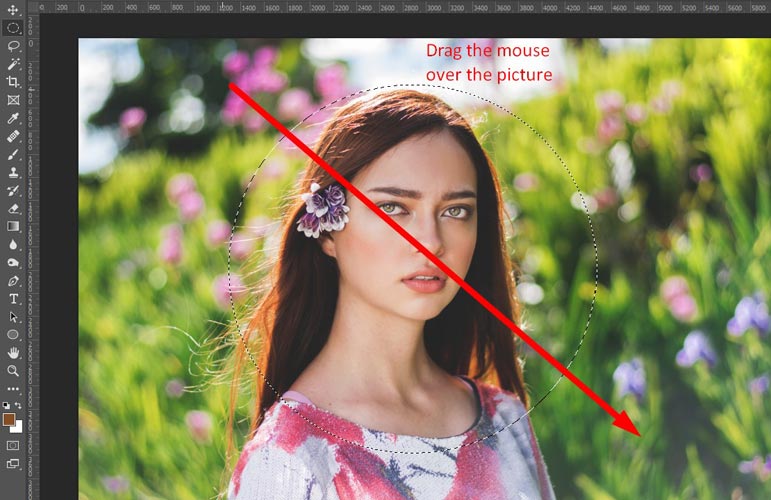
Then click on the image and start dragging out the elliptical outline. To make the selection outline in a perfect circle, you need to press and hold the Shift key on the keyboard when you drag the Elliptical Outline. Please ignore the circle outlines position. We are going to fix the photo position in the next step. When you feel satisfied with the outline area, release the mouse and shift the key, but do not forget to release the mouse first.
Step 5: Move the Selection Outline into the Right Position
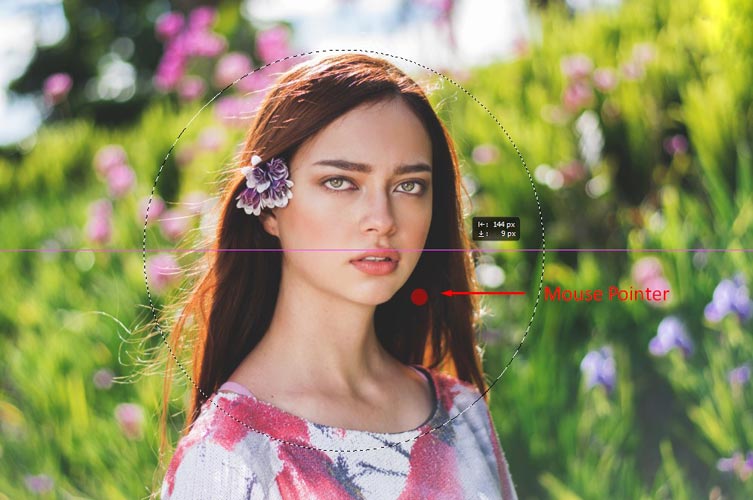
Move the selection outline around your subject. To do it, click inside the circle and move it to the exact position. You can notice I am dragging the circle outline to the center of the face.
Step 6: Inverse the Selection
As we want to crop the female face, we have to select the face area. But, if you want to keep it then you must need inverse the selection for selecting other areas. For that, click on the select menu and click on the inverse option. Or you can use the shortcut key by pressing Ctrl + Shift + I.

Now you will see that the selection is inversed and, it is only selected the outside area of the face.

Step 7: Delete the Background of Selected Area
After inverted the selection, delete the area around the circle by pressing the Backspace or Delete key on your keyboard. You will see the deleted area replaced by a transparent background.

Now, you need to deselect the outline area as we have finished cropping it. So, again the Select menu and click on Deselect or, you can use this shortcut (Ctrl+D) to deselect the areas.

Step 8: Crop the Transparent Area
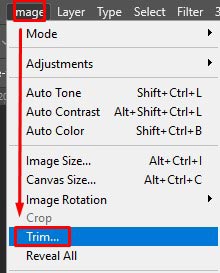
Now we have to crop the image around the circle and trim the transparent areas. Click on the Image menu and then click Trim.
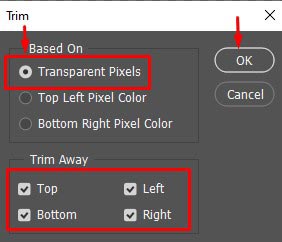
You will see the below dialog box and, you have to select the transparent pixels and select Trim away all selected to crop circle image. And then click Ok
Now, you will see that Photoshop instantly trim away the transparent areas and, our circle crop photo will remain.

Step 9: Save the Circle Crop Image as PNG
We will save the circle crop photo in PNG file format. Do you know why PNG format? Because we need to keep the corners transparent. So, the JPEG version does not support transparency but, the PNG format does. Also, PNG format supports all web browsers.
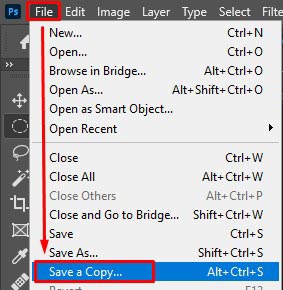
Go to the File menu click on Save a Copy to save a circle crop photo in PNG format. Remember, you may not get the save a copy option in some other version of Photoshop. You will find all the file formats in the Save as Option. We have mentioned before that we are using the Photoshop CC 2021 version for this tutorial so, we don’t find all the file formats in Save As option. In Photoshop cc 2021 all file formats have been moved to the Save a copy option.
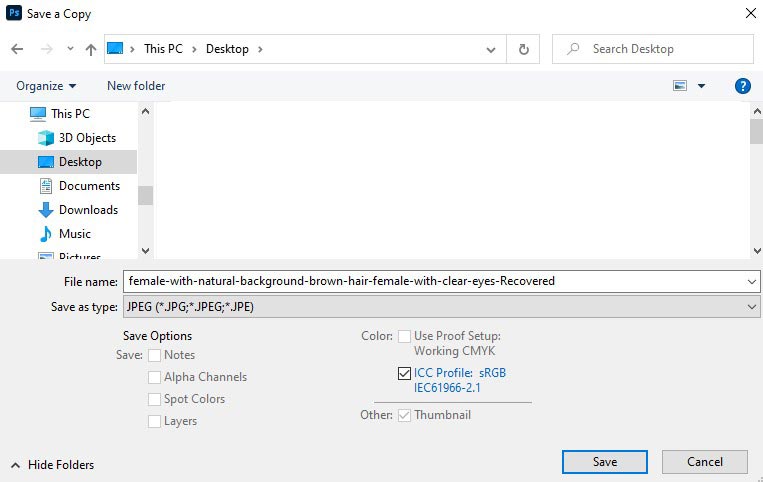
Now you will see a dialog box like this
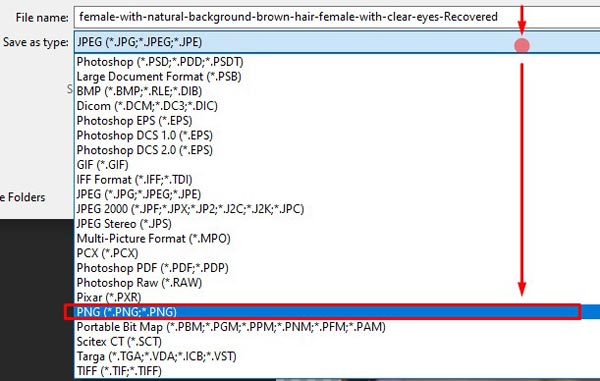
Now click the file save as type and go down to choose PNG and then click on Save.
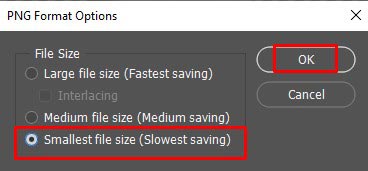
Now the below dialog box will appear and, you need to select the smallest file size option and click on ok.
Now, see the final image that we wanted.

I think that is enough to learn how to crop a picture into a circle. If you still have questions you can contact us. Also, you can hire our photo editing professionals for your assistance.


