Are you a finding Photoshop tutorial to start working with this excellent photo editing software? I will suggest you learn Photoshop tools and their uses first. Before start working with new software, you should be master its tools. Adobe Photoshop tools are very much friendly to work for photo post production. But you must have to know how Photoshop tool.
Table of Contents
Photoshop Tools in Toolbar:
This section discusses the Photoshop tools in toolbar, its default position, position customization, single and double column toolbar, and how to get back the Photoshop toolbar if it disappears.
Photoshop Tools in Toolbar Default Position:
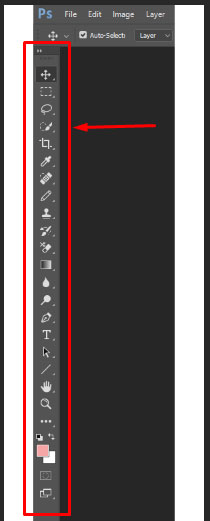
When you open Adobe Photoshop, you will see a long bar aligning vertically left side. That is the default position. You can move it as you want.
How to Move the Toolbar:
By default, the Photoshop toolbar is anchored with the software’s left side, but that’s not fixed. You can move the toolbar as per your need. To move the toolbar, you need to click on the lines above the move tool (see the screenshot below), hold the mouse’s left button, and then move.

Now you can move the tool anywhere by the same process also anchor it again to the default position.
Double and Single Column Toolbar Photoshop CC:
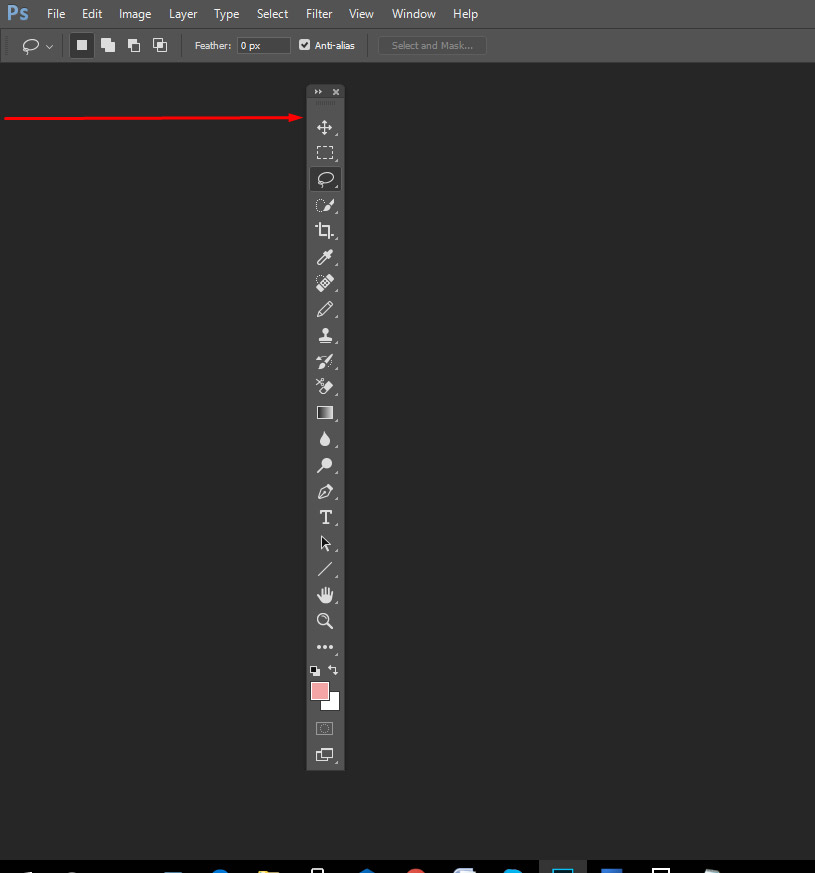
Generally, we saw a single long column on the toolbar in Photoshop, but a double-column option will allow you to change it single and double. In this regard, you should click on the double arrow on the top of the toolbar.

If you click again, that will be single.

How to add or Remove Tools in Photoshop CC:
If you want to add or remove any tools from the toolbar, that is possible on Photoshop cc versions only. Other versions down cc don’t allow you to do that. This is an extra advantage of Photoshop CC tools. To add or remove photoshop tools, you need to click on the right button on the three dots on the toolbar’s bottom side.

Now you can see the following photo.
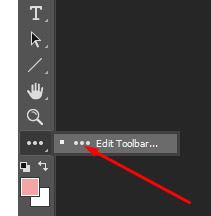
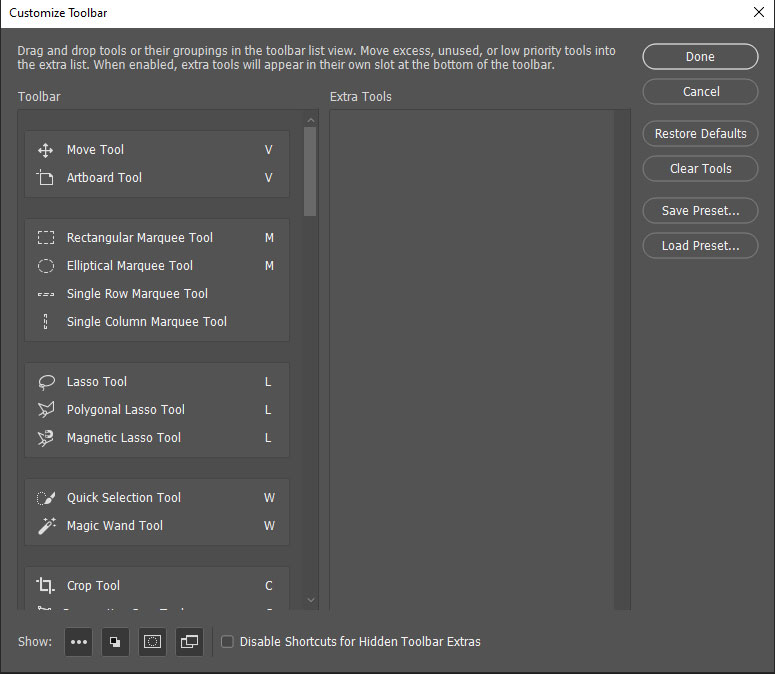
Now click the left button on the edit toolbar a new popup window will open. Check the popup window and do what you want.
How to Get Toolbar Back in Photoshop:
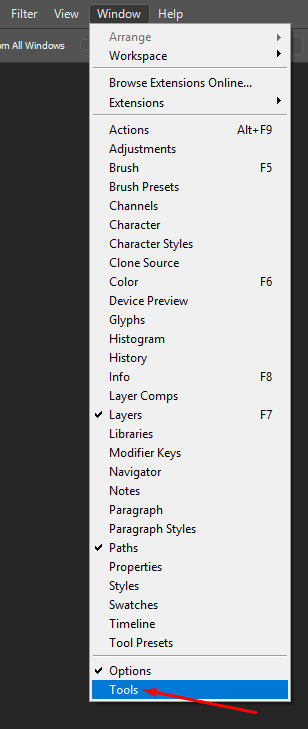
If you notice that your Photoshop toolbar is disappeared, what should you do? It is very disappointing if the toolbar disappears when working with Photoshop. However, it is easy to get the toolbar back in Photoshop cc with a few clicks. First, click on the window from the top bar, then click on tools. Now you can see the toolbar again.

Photoshop Tools Default Layout and Tool Shortcut:
Look at the following photo where you will find photoshop tools default layout and shortcuts.
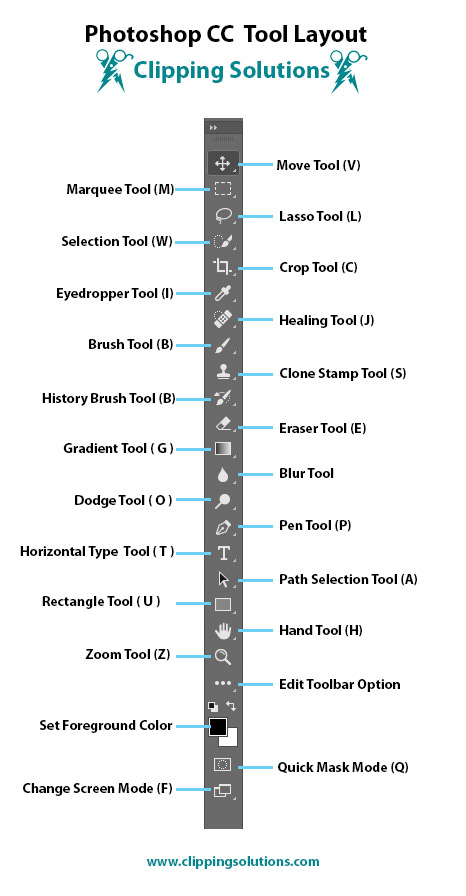
Also, there are some hidden tools on each tool. Every tool has its icon. We will learn about all of the Photoshop default tools as well as the hidden tools.
Hidden Tools in Photoshop CC Default Layout:
There are many hidden tools under the tools on the default layout. Now we get ideas about Photoshop CC hidden tools one by one.
Photoshop Hidden Tools under Move Tool:
There is one hidden tool under the move tool. That is the Artboard Tool. You can find the hidden tool by clicking the right button on the down arrow in the default tool’s right corner.
Photoshop Hidden Tools under Marquee Tool:

There are four tools under this section rectangular marquee tool, Elliptical Marquee, Single Row Marquee, and Single Column Marquee Tool.
Photoshop Hidden Tools under Lasso Tool:
Under Lasso Tool, you will find three tools Lasso, Polygonal Lasso, and Magnetic Lasso Tool.

Photoshop Hidden Tools under Quick Selection Tool:

You will find one hidden tool under the quick selection tool that is Magic Wand Tool.
Photoshop Hidden Tools under Crop Tool:
There are three hidden tools in Crop Tool; these are Perspective Crop Tool, Slice Tool, and Slice Select Tool.

Photoshop Hidden Tools under Eyedropper Tool:

You will get total four tools, including Eyedropper in this section; Color Sampler, Ruler, and Note Tool.
Photoshop Hidden Tools under Spot Healing Brush Tool:
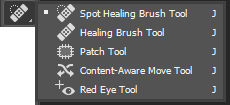
In this tool, you will have Healing Brush, Patch, Content-Aware Move, and Red Eye Tool is hidden. All of these tools are called retouching tools.
Photoshop Hidden Tools under Brush Tool

You will get total four tools, including Eyedropper in this section; Color Sampler, Ruler, and Note Tool.
Photoshop Hidden Tools under Clone Stamp Tool:
Clone Stamp and Pattern Stamp Tool are in one section, and here pattern stamp is hidden.

Photoshop Hidden Tools under History Brush Tool:
In this section, History Brush is the default, and Art History Brush Tool is laid as hidden.
Photoshop Hidden Tools under Eraser Tool:
Background Eraser and Magic Eraser Tool are laid as hidden under Eraser Tool.

Photoshop Hidden Tools under Gradient Tool:

Paint Bucket Tool is hidden under Gradient Tool
Photoshop Hidden Tools under Blur Tool:
Blur is one of the retouching tools of Adobe Photoshop; Sharpen and Smudge Tools are hidden under Blur Tool.

Photoshop Hidden Tools under Dodge Tool:

There are two hidden tools under Dodge Tool, those are Burn Tool and Sponge Tool.
Photoshop Hidden Tools under Pen Tool:
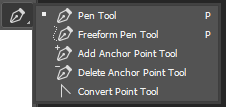
Pen tool is mostly used tools. There are five tools Freeform Pen Tool, Curvature Pen Tool, Add Anchor Point Tool, Delete Anchor Point Tool, and Convert Point Tools are laid as hidden tools in Pen Tool.
Photoshop Hidden Tools under Horizontal Type Tool:

Horizontal Type Tool is the default tool for type in Photoshop. Vertical Type, Vertical Type Mask, and Horizontal Type Mask Tool are hidden here.
Photoshop Hidden Tools under Path Selection Tool:
Direct Selection Tool is hidden under Path Selection Tool. If you need to use this tool, you should right.
Photoshop Hidden Tools under Rectangle Tool:
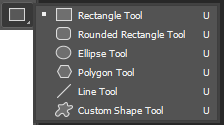
Rounded Rectangle Tool, Ellipse Tool, Triangle Tool, Polygon Tool, Line Tool, and Custom Shape Tool are laid as hidden under Rectangle Tool
Photoshop Hidden Tools under Hand Tool:
You will find Rotate View Tool hidden under Hand Tool.

Photoshop Tools and Tool Shortcuts:

Move Tool (V)
The Move Tool is to move layers and selections in Photoshop document.

Move Tool (V)
Artboard Tool lets you design multiple UX or web layouts for different devices and screen sizes.

Rectangular Marquee Tool (M)
Rectangular Marquee Tool uses to rectangular selection outlines in Photoshop. Press and hold Shift key from the keyboard if you want to draw a perfect selection.

Move Tool (V)
The Move Tool is to move layers and selections in Photoshop document.

Elliptical Marquee Tool (M)
Elliptical Marquee Tool is for drawing elliptical selection outlines in Photoshop. Press and hold Shift key from the keyboard if you want to draw a perfect selection.

Single Row Marquee Tool
In Adobe Photoshop Single Row Marquee Tool helps to select a single row in an image horizontally.

Single Column Marquee Tool
Single Column Marquee Tool uses to select a column vertically.

Lasso Tool (L))
Lasso Tool uses to create a freeform selection around any object of a photo layer.

Polygonal Lasso Tool (L)
By Polygonal Lasso Tool, you can click around a photo or its objects and select the area.

Magnetic Lasso Tool (L)
Magnetic Lasso Tool is handy to select an object’s edges as you move the mouse cursor around it.

Quick Selection Tool (W)
Quick Selection Tool helps to select an object very quickly by painting with a brush. You can use this tool for creating a simple path over any photo.

Magic Wand Tool (W)
Magic Wand Tool works magically. It selects a similar color in a single click, and you can set the tolerance value from the Options Bar.

Crop Tool (C)
In Photoshop, the Crop Tool applies to remove unwanted areas. This tool also helps us to resize an image.

Perspective Crop Tool (C)
Perspective Crop Tool is a hidden tool under crop tool. You can use this tool for both crop and fix perspective problems.

Slice Tool (C)
Slice Tool is also hidden under crop tool. It can divide a photo or a layout into small slices, which can export and optimize individually.

Slice Select Tool (C)
Slice Select Tool lies under the toolbar’s crop tool, and this tool uses to select, resize, and move the slices.

Eyedropper Tool (I)
Photoshop Eyedropper Tool uses to get a color sample from a photo. If you want to use a specific color for your design, click on the color by eyedropper tool and use that color where you want.

Color Sampler Tool (I)
Color Sampler Tool is hidden under the eyedropper tool. It plays color values for chosen (sampled) area of a photo, and you can get a color sample maximum of four times.

Ruler Tool (I)
Ruler Tool is an advanced Photoshop tool. If you need to measure distance, angle, and location, you should use the Ruler Tool. This great tool gives you exact result for positioning you elements in photo layers.

Note Tool (I)
The note is another excellent Photoshop Tool permits you to add text notes to Photoshop document.

Spot Healing Brush Tool (J)
Spot Healing Brush is a retouching tool in Adobe Photoshop. This tool quickly fix spots, blemishes, and other small problems and removes them from a photo.

Healing Brush Tool (J)
You can fix large problem areas of a photo using the Healing Brush tool. Hold Alt for windows and Option for Mac and click anywhere you want to get sample texture and paint over the area you want to fix.

Patch Tool (J)
Patch Tool is for drawing a freeform selection around a bad part of a photo. Then drag the selection area on the good part of your image. It will fix the problem automatically using the source and the selected surface.

Content-Aware Move Tool (J)
Content-Aware Move Tool is also regarded as retouching Photoshop Tool. This tool selects and moves apart from a photo to another area when you select a damaged part of an image and move in a good area using Photoshop Content-Aware Move Tool to fix the problem automatically.

Red Eye Tool (J)
Red Eye Tool applies to fix the common red-eye effect. If you can be an expert with this Photoshop tool, you can remove the red-eye effect from a photo correctly.

Brush Tool (B)
Photoshop Brush Tool is a painting tool. Brush uses to paint color strokes to a part of a photo layer.

Pencil Tool (B)
Pencil Tool is hidden under Brush Tool. It is a drawing tool. This virtual pencil will allow you to draw lines, design, and artwork.

Color Replacement Tool (B)
Using Color Replacement Tool, you can replace one color with a different one very quickly.

Mixer Brush Tool (B)
Mixer Brush reproduces realistic painting systems, such as mixing the colors on a canvas, mingling colors on a brush, and differing paint wetness over the stroke.

Clone Stamp Tool (S)
Clone Stamp Tool is one of the basic retouching tools in Adobe Photoshop, and you can repair any damages with this Photoshop tool. It takes sample pixels of one area from a photo and paints them in another bad area.

Pattern Stamp Tool (S)
Pattern Stamp Tool is to paint one pattern over a photo.

History Brush Tool (Y)
History Brush tool allows bringing back a part of an image to its earlier history.

Art History Brush Tool (Y)
Photoshop Art History Brush tool paints by a simulated stroke, with a particular history’s source data.

Eraser Tool (E)
Erase tool uses to remove pixels from a layer. It is like a brush tool, and you can change the size and hardness. It helps erase unwanted pixels permanently.

Background Eraser Tool (E)
You can use Background Eraser Tool to any unwanted areas of an image background. You can also remove similar colors in a photo painting them.

Magic Eraser Tool (E)
Magic Eraser Tool can delete similar colors of pixels from a photo with a single click. It is almost identical to Magic Wand Tool, but it permanently removes the selected areas.

Gradient Tool (G)
Gradient Tool uses to create gradual blends between several colors. The Gradient Editor allows you generate and modify required gradients.

Paint Bucket Tool (G)
Paint Bucket Tool fills up an area with a color which you set in the Foreground color section. The Tolerance value decides the range of colors around the room.

Blur Tool
The Blur Tool softens and blurs the areas you paint over by the tool.

Sharpen Tool
Sharpen tool uses to sharp a selected area. You just paint with the tool over your desired space.

Smudge Tool
Photoshop Smudge Tool uses to smudge and spread the area of a photo layer you paint over with it. It also uses to generate finger painting.

Dodge Tool (O)
If you paint Dodge Tool over any areas of an image, it will lighten them.

Burn Tool (O)
Burn Tool is opposite to Dodge Tool. If you paint Burn Tool over any areas of an image, it will darken them.

Sponge Tool (O)
If you want to increase or decrease color saturation, just paint over the areas with the Sponge Tool.

Pen Tool (P)
Photoshop Pen Tool allows you to draw clipping paths, vector outlines, and selections.

Freeform Pen Tool (P)
The Freeform Pen Tool enables easy drawing vector shapes and paths by adding anchor points in an automatic way.

Add Anchor Point Tool
Add Anchor Point Tool helps to add extra anchor points in a path.

Delete Anchor Point Tool
This tool uses to delete an anchor point from a path. If you want to eliminate an extra anchor point from a path then use Delete Anchor Point Tool.

Convert Point Tool
Convert Point is a Photoshop Tool that edits existing vector shape masks and paths by converting smooth anchor points to corner anchor points.

Horizontal Type Tool (T)
Horizontal Type Tool is a standard Photoshop tool for typing any text document in a photo. This tool adds your text horizontally.

Vertical Type Tool (T)
By Vertical Type Tool, you can add text type vertically in any photo document.

Vertical Type Mask Tool (T)
When you select the Vertical Type mask Tool to type any word, it will create a word mask vertically instead of the letter shape.

Horizontal Type Mask Tool (T)
Also, when you select the Horizontal Type mask Tool to type any word, it will create a word mask Horizontal instead of the letter shape.

Path Selection Tool (A)
Path Selection Tool uses to select and move the current path.

Direct Selection Tool (A)
You can select and move a path segment and anchor point by the Direct Selection Tool.

Rectangle Tool (U)
Rectangle Tool is a rectangular vector path shape in Photoshop toolbar. If you need a rectangle shape drawing, you can use this tool.

Rounded Rectangle Tool (U)
Rounded Rectangle Tool allows the creation of a shape in Photoshop. If you need a round rectangle shape drawing, you can use this tool.

Ellipse Tool (U)
Photoshop Ellipse Tool lets you make the shape of an ellipse. Press and hold the shift key if you need to draw a perfect circle.

Polygon Tool (U)
Polygon Tool allows you to draw a polygonal shape from any side.

Line Tool (U)
Line Tool helps to draw straight lines or arrows.

Custom Shape Tool (U)
Custom Shape Tool is a CC version Photoshop Tool. It lets you select and custom shape.

Hand Tool (H)
Hand Tool allows you to move the image anywhere on the screen. Once you click on the hand tool, your mouse cursor turned into a hand shape. Now move it on the photo layer, then press and hold the left button. You can move the coating on your screen.

Rotate View Tool (R)
This Photoshop Tool uses to rotate the canvas for viewing the image from different angles.

Zoom Tool (Z)
Zoom Tool is to zoom in and zoom out a photo. Click on the image after selecting the zoom tool will zoom in the picture, and for zoom out, press and hold Alt for Windows and Option for Mac and click on the image.


